2015年8月2日 星期日

佈署網站

1.申請一個亞馬遜免費主機
http://blog.json.tw/teaching-ten-minutes-to-quickly-build-a-free-amazon-ec2-host
其中security,一開始先選擇port:3000
申請完後記下public ip

2.申請一個網域
https://www.godaddy.com/?isc=gofhtw03&ci=
https://sofree.cc/wordpress-box-tip-1/
申請一個好記又好聽的名子
在這個網頁選擇Manage DNS,可以增加record (設定IP)以及設定Nameserver


3.使用DNS代管
https://www.cloudflare.com/
登入後到下面網頁選擇DNS,增加一個record,填入網域名稱以及網址,記下NameServer
將Nameserver 填入上一個步驟的網頁裡。

4.執行nslookup nomain_name IP 確認網域是否與IP連線成功
http://extra.pchome.com.tw/adm/faq_content02.htm?channel_no=&exh_no=P000007&pexh_no=P000181&cexh_no=H000185&faq_id=327&qnum=1

5.在ubuntu環境裡還可以使用whois來確認網域名稱的狀態
或是:
http://www.whois365.com/tw/
https://www.whois.net/
6.登入amazon主機
ssh -i "coolio.pem" ubuntu@52.24.185.68 or ssh -i "coolio.pem" ubuntu@ironcaptain.com
其中coolio.pem是申請虛擬雞過程產生的ssh key

7.接下來就是一般ubuntu的操作,安裝git,node js,express....
8.安裝nginx 
http://wiki.nginx.org/Install
增加一個nginx設定檔/etc/nginx/conf.d/ironcaptain.com.conf
內如如下
upstream backend{
  server 120.0.0.1:3000; 
}
proxy_cache_path /var/nginx/cache/ironcaptain keys_zone=ironcaptain:20m;
 
server{
 listen 80;
 server_name ironcaptain.com;
 access_log /var/log/nginx/ironcaptain.access.log;
 proxy_cache ironcaptain;
 location / {
  proxy_pass http://backend;
 }
}

說明:
1.server 120.0.0.1:3000:主機使用port 3000但是由nginx管理的port 80對外 (listen 80;)
2.proxy_cache ironcaptain;指定cache的大小(20M)與存放位址
3.server_name ironcaptain.com;登入的網址
4.location / :主頁 會轉到http://backend;也就是server 120.0.0.1:3000;
5.當有佈署其他的主機在此欄位增加
upstream backend{
  server 120.0.0.1:3000;
  server 120.0.0.1:3001; 
}
啟動service
1.service nginx start
2.service nginx restart
http://serverfault.com/questions/213185/how-to-restart-nginx
http://wiki.nginx.org/InitScripts
9.安裝node js daemon forever
https://github.com/foreverjs/forever
啟動:
forever start app.js
其中app.js 是nodejs的啟動程式在我們的case要看package.json中的"start": "node ./bin/www"
所以應該是執行 
forever start ./bin/www
停止 :
forever stop./bin/www

2015年5月30日 星期六

將D3 js porting 到backbone 框架

1.下載source code
https://github.com/wotcity/dotcity-starter-kit安裝套件
npm i -g browserify
npm i -g gulp
npm i -g bower  
npm install
npm i d3 --save
bower install
2.到D3 js 選擇適當的模組 http://d3js.org/
3.將範例HTML使用到的 module require 到src/index.js css加到index.html
4.將範例HTML中的script標籤移植到到src/index.js中
5.在執行C:\dotcity-starter-kit-master\gulp build 結果產生在dist/index.js
6.登入wot city 記下device ID
7.修改tests/test.js 將ID填入
8.執行 tests/node test.js push DATA到server
9.打開index.html在URL後面加#XXXXXX =>XXXXX是device ID名稱

2015年5月16日 星期六

Node.js +REST API 實作(1)

將井字遊戲中的分數紀錄用rest api來實作
1.首先在routes.js中增加以下幾個設定
   // partjs boilerplate
  app.get('/timeline*', require('./views/timeline/index').init);
  app.get('/post*', require('./views/post/index').init);
  app.get('/unsplash*', require('./views/unsplash/index').init);
  app.get('/about', require('./views/index').about);  
  app.get('/sensor', require('./views/index').sensor);  
  app.get('/dashboard', require('./views/index').dashboard);  
  app.get('/1/game', require('./views/api/game.js/index').read); 
  app.post('/1/game', require('./views/api/game.js/index').write);  
  app.post('/1/game:name', require('./views/api/game.js/index').test); 

2.在上述的路徑中增加一個index.js的檔案內容如下

var score = {
  you:0,
  me:0
 };

exports.read = function(req, res){
res.json(score);
 };

exports.write = function(req, res){
 var action = req.query;
 var score = req.body;                      //===>body?什麼的函式庫來的
 res.json(score);

};

exports.test = function(req, res){
 var name = req.params.name;
 console.log('name : '+ name);
  res.json(score);
};

3.在Front end讀取rest api 使用backbone 框架
在game.js中設定model 
app.Contact = Backbone.Model.extend({  //1
      url: '/1/game',
      defaults: {
        you:0,
        me:0
    }
 });

在view中加入變數的處裡函數

if(this.result.indexOf(3) !== -1){
      var you = this.model.get('you');
      this.model.set('you',you+1);
      this.model.save();
      alert('X 贏 ');
      this.render();
    }
        

    if(this.result.indexOf(-3) !== -1){
      var me = this.model.get('me');
      this.model.set('me',me+1);
      this.model.save();
      alert('O 贏');
      this.render();
    }
4.接下來增加顯示的部分
 render: function() {
      this.$el.prepend(this.template( this.model.attributes ));//3
      console.log(this.model.attributes)
      var self = this;
      setInterval(function(){
        var item = Math.floor(Math.random()*9);
        var me = $("[data-num="+ item +"]");
        
        me.removeClass('fa-circle-o');
        me.removeClass('fa-times');
        self.n[item]=0;
    },1000);
    },

2015年5月10日 星期日

IOT實驗

1.Hello world mBed
    1.到mbed網站申請帳號
    2.加入devivce
    3.creat project
2.溫度sensor實驗
   1.到Study spec
      http://www.seeedstudio.com/wiki/index.php?title=Main_Page#Grove
      http://www.seeedstudio.com/wiki/Grove_-_Starter_Kit_Plus
   2.作法參考
       https://www.mokoversity.com/workshop/mbed-school/02-gpio-introduction
3.加上四段顯示器
    1.載入lib
       https://developer.mbed.org/users/Seeed/code/DigitDisplay/
    2.參考
       https://developer.mbed.org/users/yihui/code/Arch_Digit_Display/file/89330707469d/main.cpp
4.上網
    1.載入EthernetInterface這個lib,編譯時會發生error再載入mbed_rtos這個lib
    2.再載入WebSocketClient這個lib
程式碼如下:
#include "mbed.h"
#include "DigitDisplay.h"
#include "EthernetInterface.h"
#include "Websocket.h"

AnalogIn temp(P0_23);
DigitalOut myled(LED1);
DigitalOut myled1(LED2);
DigitDisplay digdisp(P4_29,P4_28);
EthernetInterface eth;
int main() {

    char data[1024];
    float temperature;
    float resistance;
    int B=3975;                  //B value of the thermistor
    int a;
    int ret;

    eth.init(); //DHCP
    eth.connect();
 
    Websocket ws("ws://wot.city/object/554ed61eae74407734000119/send");
    ws.connect();
 
loop:
    a=temp.read()*657;
    resistance=(float)(1023-a)*10000/a; //get the resistance of the sensor;
    temperature=1/(log(resistance/10000)/B+1/298.15)-273.15;//convert to temperature via datasheet
    sprintf( data , "{ \"temperature\": %f }", temperature);
    ret = ws.send(data);
    myled1 = 1;
    wait(0.5);
    myled1 = 0;
    wait(0.5);
    goto loop;
}  
   3.到http://wotcity.com/申請帳號產生一個務間編號將他填到Websocket contruct之中
 
 當裝置連線為live即可利用live App看到溫度數值


5.修改網頁
    1.到http://wotcity.com/docs/dotcity-starter-kit下載網頁包
    2.解壓縮照上面的步驟安裝函示庫
    3.打開網址在網址後面輸入#554ed61eae74407734000119

即可看到溫度計的結果


2015年5月2日 星期六

bootstrap第三天實驗

用jQuery寫一個井字遊戲
1.jQuery原始檔


(function(){
var flag = 0;
var n=[0,0,0,0,0,0,0,0,0];
var result=[0,0,0,0,0,0,0,0];
var invalidate = function(item){  //時間到一定會執行
$( '.cell' ).each(function(idx) {
if(idx !== item)
return;
var me = $(this);
  me.find('i').removeClass('fa-circle-o');
  me.find('i').removeClass('fa-times');
  n[idx] = 0;
});
};

setInterval(function(){
var item = Math.floor(Math.random()*9);
invalidate(item);
},1000);


$( '.cell' ).each(function(idx) {
  var me = $(this);               //一開始會直9次註冊每個 cell 物件的click event call back function
  me.on('click',function(){  //只有在click evevt 發生時才會執行
  if(me.find('i').hasClass('fa-circle-o') || me.find('i').hasClass('fa-times'))
  return;
  //if (flag == 9)
  // return;
  if(flag % 2)
me.find('i').addClass('fa-circle-o');
else
me.find('i').addClass('fa-times');

flag++;

n[idx] = (flag % 2) ? 1:-1;
result[0]=n[0]+n[1]+n[2];
result[1]=n[3]+n[4]+n[5];
result[2]=n[6]+n[7]+n[8];
result[3]=n[0]+n[3]+n[6];
result[4]=n[1]+n[4]+n[7];
result[5]=n[2]+n[5]+n[8];
result[6]=n[0]+n[4]+n[8];
result[7]=n[2]+n[4]+n[6];


if(result.indexOf(3) !== -1)
alert('You win');

if(result.indexOf(-3) !== -1)
alert('I win');
  })
});
})();

2.html檔

<!DOCTYPE html>

<html lang="en">
  <head>
    <meta charset="utf-8">
    <meta http-equiv="X-UA-Compatible" content="IE=edge">
    <meta name="viewport" content="width=device-width, initial-scale=1">
    <!-- The above 3 meta tags *must* come first in the head; any other head content must come *after* these tags -->
    <title>Bootstrap test</title>

    <!-- Bootstrap -->
    <link href="/vendor/bootstrap/dist/css/bootstrap.min.css" rel="stylesheet">
    <link href="/vendor/font-awesome/css/font-awesome.min.css" rel="stylesheet">
    <link href="/game.js/game.css" rel="stylesheet">

  </head>
  <body>
<div class="container" id="game">
  <div class="row">
    <div class="cell col-md-4 col-sm-4 col-xs-4"><i data-num='0' class="fa">&nbsp;</i></div>
    <div class="cell col-md-4 col-sm-4 col-xs-4"><i data-num='1' class="fa">&nbsp;</i> </div>
    <div class="cell col-md-4 col-sm-4 col-xs-4"><i data-num='2' class="fa">&nbsp;</i> </div>
  </div>
  <div class="row">
    <div class="cell col-md-4 col-sm-4 col-xs-4"><i data-num='3' class="fa">&nbsp;</i></div>
    <div class="cell col-md-4 col-sm-4 col-xs-4"><i data-num='3' class="fa">&nbsp;</i> </div>
    <div class="cell col-md-4 col-sm-4 col-xs-4"><i data-num='5' class="fa">&nbsp;</i> </div>
  </div>
  <div class="row">
    <div class="cell col-md-4 col-sm-4 col-xs-4"><i data-num='6' class="fa">&nbsp;</i></div>
    <div class="cell col-md-4 col-sm-4 col-xs-4"><i data-num='7' class="fa">&nbsp;</i> </div>
    <div class="cell col-md-4 col-sm-4 col-xs-4"><i data-num='8' class="fa">&nbsp;</i> </div>
  </div>
</div>
    <script src="/vendor/jquery/dist/jquery.min.js"></script>
    <script src="/vendor/bootstrap/dist/js/bootstrap.min.js"></script>
    <script src="/game.js/game.js"></script>
  </body>
</html>

bootstrap第二天實驗

新增一個jade樣板
1.在./routes.js中新增app.get('/landing', require('./views/index').landing);
   /landing:是url的名稱,
   ./views/index是指./views/index.js
  .landing:是指/views/index.js 中export檔案的名稱
2.接下來看./views/index.js這個檔案在這個檔案新增
    exports.landing = function(req, res){
             res.render('landing');       //代表會去找landing.jade這個檔案做render的動作
   };
3.再來參考index.jade新增landing.jade
   打開index.jade:

extends layouts/default

block fb_meta
  meta(property='og:site_name', content='PartJS')
  meta(property='og:title', content='Next generation WoT and SPA.')
  meta(property='og:url', content='#{currentURL("")}')
  meta(property='og:image', content='')
  meta(property='article:published_time', content='')

block head
  title Next Generation WoT and SPA Framework

block neck

block feet
  script(src='/views/build/sandbox.js')
  //- script(src='/views/build/index.js')

block body
....

其中extends layouts/default代表index.jade繼承自./views/layouts/default.jade
打開default.jade
doctype html
html
  head
    block meta
    block fb_meta
    block head
    include css
    block neck
  body#top
    include navbar

    div.page
      block body

    include js
    block feet

    include footer

可以看出這是整個頁面的樣板其中的, block fb_meta,block head 就是樣板的成員變數
而index.jade繼承default.jade樣板並複寫其成員變數block fb_meta,block head...
當中include是用來導入其他jade file的語法。
4.jade是利用縮排來代表巢狀結構

參考
1.http://rhsieh76.pixnet.net/blog/post/48559282-%E6%B7%BA%E8%AB%87node.js%E6%A8%A1%E7%89%88%E5%BC%95%E6%93%8E%E2%80%93-jade
2.http://jade-lang.com/


2015年4月27日 星期一

bootstrap 第一天實驗

1.網頁為MVC架構,前端主要為html,javascrip,css三者所構成。
   框架的跟目錄為 \partjs-master\public
   例如:include css檔放在 <link href="/index.css" rel="stylesheet">
   其中index.css所在的目錄為\partjs-master\public\index.css

2.自動更新網頁的工具gulp

  • 安裝gulp: npm -g i gulp
  • 編輯gulpfile.js   在gulp.task('serve', function () 加入
           browserSync.init(null, {

                  server: {
                        baseDir: ['app', '.tmp']
                   },
                  notify: false
          });


         gulp.watch(['public/index.cssl'], reload); 


  • 執行 gulp serve 
3.minify
  • 方法一 grunt build
  • 方法二 修改Gruntfile.js
           uglify: {
                     less: {
                              views: {

                                         files: [{
                                                 expand: true,
                                                 cwd: 'public/',
                                                 src: ['*.css'],
                                                 dest: 'public/',
                                                 ext: '.min.css'
                                         }

                              }   
                     }             
           }
         
         執行grunt less:views
4.jade jade file可編譯成html語法上用縮排來代表巢狀結構
   找到routes.js檔找到//partjs boilerplate
   參考 app.get('/dashboard',requirre(./views/index').dashboard);
   由此可知道在views底下有一個index.jade檔將他打開來後在檔案的頭有一行
   extend layouts/default 然後去views/layouts
   底下找到default.jade就可以找到相對應的jade檔案設定再根據裡面的設定去修改他。


Bootstrap 環境架設

Bootstrap:
1.網頁APP的主流框架,但不知緣目前依些網頁設計工具
2.其特色是使用command line方式來操作

環境架設
windows:
1.安裝node js  https://nodejs.org/
2.安裝python 2.7.X  https://www.python.org/downloads/
3.安裝git for windows  http://git-scm.com/download/win
4.下載 partjs  https://github.com/partjs/partjs  解壓縮到 C:\底下
5.申請 mongolab 帳號 https://mongolab.com/
   在MongoDB deployment增加一個plan,然後在plan創建一個user
6.打開命令提示字元進入C:\partjs-master
7.cp config.example.js config.js
8.然後打開config.js修改紅色字的地方
  uri: process.env.MONGOLAB_URI || process.env.MONGOHQ_URL || 'localhost/drywall'
改成申請的帳號跟密碼'mongodb://<dbuser>:<dbpassword>@ds041387.mongolab.com:41387/moko365_test'
ps:此字串在mongolab中申請得到的
9.install 一些npm工具
   npm update -g bower
   npm i -g bower
   npm -g i forever
   npm -g i grunt-cli
10.執行node app.js
11.開瀏覽器輸入http://localhost:3000/

就可以看到網頁的畫面

一些free source的網站
http://getbootstrap.com/
http://bootsnipp.com/
https://github.com/erikflowers/weather-icons
https://unsplash.com/
http://designmodo.github.io/Flat-UI/


ps:過程中出現"Error: Cannot find module 'express'"這個錯誤
     決方法:執行 npm install


2015年4月17日 星期五

Conversion From ' ' To Non-Scalar Type ' ' Requested

CeMMCDriver *pFDriver = new CeMMCDriver ();
CFlash tflash = new CFlash(pFDriver );

以上的 code編譯後將出現
Conversion From ' CFlash ' To Non-Scalar Type ' CFlash ' Requested 的錯誤

若將程式碼改成
CeMMCDriver *pFDriver = new CeMMCDriver ();
CFlash *tflash = new CFlash(pFDriver );

CeMMCDriver *pFDriver = new CeMMCDriver ();
CFlash *tflash ;
tflash = new CFlash(pFDriver );
則沒問題

2015年3月9日 星期一

在ubuntu 14.04 編譯 linux kernel

首先下載想要的linux kernel
https://www.kernel.org/pub/linux/kernel/v3.x/
然後解壓縮

安裝必要的package:
sudo apt-get install fakeroot build-essential kernel-package libncurses5 libncurses5-dev
sudo dpkg -i kernel-package_13.003_all.deb
sudo rm /var/lib/apt/lists/lock
sudo rm /var/cache/apt/archives/lock

接下來設定環境:
kerVer='3.15.7/linux-3.15.7'
KernelPath=$(sudo find /media/vli -name 'Kernel' | grep 'Test_tool')
cd ~/Desktop/
ln -s $KernelPath/$kerVer linux
cd ~/Desktop/linux
cp /boot/config-`uname -r` ./.config

編譯kernel:
sudo make menuconfig
sudo make-kpkg clean
sudo fakeroot make-kpkg --initrd kernel_image kernel_headers

安裝kernel:
sudo dpkg -i linux-image-3.15.8_3.15.8-10.00.Custom_amd64.deb
sudo dpkg -i linux-headers-3.15.8_3.15.8-10.00.Custom_amd64.deb

重新開機:
sudo reboot

編譯 linux MMC module

到linux source code的目錄下執行
 sudo make M=drivers/mmc modules

2015年3月4日 星期三

SQL使用範例說明

1.      WCT_trace:ER模型sahaema


共有5table當要使用SQL搜尋需要的資料時可以善加利用這個Schema
2.      幾個簡單SQL範例
(1)   選擇出Blk_Data所有的資料:
selectfrom Blk_Data

(2)選擇出WCT_Table所有的資料:
selectfrom WCT_Table

(3)選擇出Blk_Data當中的LFT_Key,Dat_Addr,count(Dat_Addr)資料當CH_No = 0 and CE_No =0 其中的 Dat_Addr是不重複的:
select LFT_Key,Dat_Addr,count(Dat_Addr)  from Blk_Data where CH_No = 0 and CE_No =0 group by Dat_Addr

       (4)選擇出Blk_Data當中的所有資料當CH_No = 0 and CE_No =0 其中根據 Dat_Addr做排序:
selectfrom Blk_Data where CH_No = 0 and CE_No =0 order by Dat_addr

       (5)選擇出Blk_Data當中的LFT_Key資料當 LFT_Table.TAT_Key = 1 AND             LFT_Table.LFT_Key = Blk_Data.LFT_Key其中Blk_Data.LFT_Key是不重複:


select Blk_Data.LFT_Key from LFT_Table, Blk_Data where LFT_Table.TAT_Key = 1 and LFT_Table.LFT_Key = Blk_Data.LFT_Key group by Blk_Data.LFT_Key

2015年2月17日 星期二

使用eclipse 編譯json函式庫

C語言

參考 https://linuxprograms.wordpress.com/2010/05/20/json-c-libjson-tutorial/

使用終端機


  1. 首先安裝需要的package
  2. 利用以下的測試程式來測試環境
#include <json/json.h>
#include <stdio.h>

int main() {
 char * string = "{"name" : "joys of programming"}";
 json_object * jobj = json_tokener_parse(string);
 enum json_type type = json_object_get_type(jobj);
 printf("type: ",type);
 switch (type) {
 case json_type_null: printf("json_type_nulln");
 break;
 case json_type_boolean: printf("json_type_booleann");
 break;
 case json_type_double: printf("json_type_doublen");
 break;
 case json_type_int: printf("json_type_intn");
 break;
 case json_type_object: printf("json_type_objectn");
 break;
 case json_type_array: printf("json_type_arrayn");
 break;
 case json_type_string: printf("json_type_stringn");
 break;
 }
}
     3.  編譯   gcc json_type.c -l json

使用Eclipse

  1. 建立一個C專案,將上列測試程式加到專案中。
  2. 點專案再按右鍵->Properties->C/C++ General->Paths and Symols ->Includes加入/usr/include/json
  3. 接下來選C/C++ Build->Settings->GCC C++ Linker->Libraries加入json

C++語言

  1. 安裝需要的package # sudo apt-get install libjsoncpp-dev (ubuntu)
  2. 建立一個C++專案將下列程式碼加入
#include <iostream>       // std::cout
#include <string>         // std::string
#include <json/json.h>

int main() {
        std::string raw = "{\"key\":\"value\",\"我\":\"是誰\",\"array\":[\"a\",\"b\",123]}";
        Json::Reader reader;
        Json::Value value;
        std::cout << "Input: " << raw << std::endl;
        if (reader.parse(raw, value)) {
                std::cout << "parsing: " << value ;//<< std::endl;
                std::cout << "get: " << value["我"] ;//<< std::endl;
                std::string data = value["key"].asString();//toStyledString();
                std::cout << "string: [" << data << "]" << std::endl;

                // with -std=c++11
                std::cout << "---" << std::endl;
                for (auto it : value) {
                        std::cout << "elm: " << it ;//<< std::endl;
                        if (it.isArray()) {
                                for (auto it2 : it)
                                        std::cout << "array data: " << it2 ;//<< std::endl;
                        } 
                }         
        } 
        return 0;
}

       3.  點專案再按右鍵->Properties->C/C++ General->Paths and Symols ->Includes加入/usr/include/jsoncpp/json
       4.  接下來選C/C++ Build->Settings->GCC C++ Linker->Libraries加入jsoncpp
       5.  接下來選C/C++ Build->Settings->GCC C++  Compile->include加入/usr/include/jsoncpp/,/opt/local/include/
       6.  接下來選C/C++ Build->Settings->GCC C++  Compile->Dialect->Language standard 選   ISO C++11(-std=c++0x) PS:因為這個測試函數用到C++11的語法。
  

2015年2月12日 星期四

在Ubuntu 14.04使用eclipse創建JNI流程

建環境

1.下載jre與jdk
1.下載eclipse & eclipse CDT
2. 解壓縮eclipse與eclipse CDT並將eclipse CDT中的plugins與features copy到eclipse中

創建JNI流程

產生 JNI *.h檔

1.打開eclipse  建立一個Java project 

public class HelloJNI 
{
   static {
      System.loadLibrary("libHelloJNI"); 
   }
   private native void sayHello();
}
  1. HelloJNI project 按右鍵,選New->Other,再選 C/C++, Convert to a C/C++ Project (Adds C/C++ Nature)->Next.
  2. 當"Convert to a C/C++ Project" 視窗跳出來後.在 "Project type", 中選 "Makefile Project" ,在 "Toolchains", 中選 "Linux GCC",然後點擊 Finish. 
  3. 在project裡增加一個資料夾"jni"在jni中增加一個檔案makefile 內容如下
# Define a variable for classpath
CLASS_PATH = ../bin

# Define a virtual path for .class in the bin directory
vpath %.class $(CLASS_PATH)

# $* matches the target filename without the extension
HelloJNI.h : HelloJNI.class
 javah -classpath $(CLASS_PATH) $*

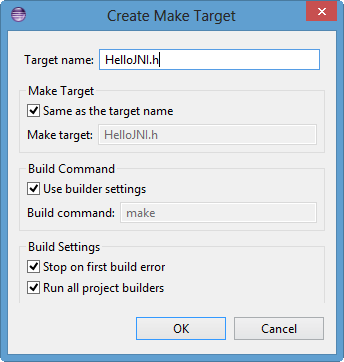
    4.  選makefile 點擊右鍵選 Make Targets->Create...然後跳出一個對話框

     CreateMakeTarget_hello_jni_h.png
   5.  接下來執行makefile->Make Targets->Build 跳出對話框後選擇HelloJNI.h然後按Build將會在jni資料夾中產生HelloJNI.h。

產生Share library  *.so

  1  .在eclipse創建一個c project "HelloJNI",Project type選Shared Library,
        Toolchains選linux GCC 按finish
   2.  將步驟5產生的HelloJNI.h 複製到HelloJNI這個project然後實作HelloJNI裡宣告的函數
#include <jni.h>
#include <stdio.h>
#include "HelloJNI.h"
 
JNIEXPORT void JNICALL Java_HelloJNI_sayHello(JNIEnv *env, jobject thisObj) 
{
   printf("Hello World!\n");
   return;
}

    3. 然build all一次,會出現一些 error
        1.Fatal error : jni.h : No such file or directory
         解法:選擇Project->Property->C/C++ General ->Paths and Symbols->include
                   Languages->GUN C 再按 Add 將JAVA_HOME裡的include以及include/linux加入                            然後按ok再編譯一次。
        2.Description Resource Path Location Type ./main.o: relocation R_X86_64_32 against `.rodata' can not be used when making a shared object; recompile with -fPIC HelloJNI
          解法:選擇project->Property->C/C++ Build->GCC Compileer->Miscellaneous勾選(-fPic)
        3.*** no rule to make target all'. stop
           解法:
                   1.網路上有人的作法是Project->Property->C/C++ Build->Behavior->Build(incremental build) Text edit中的all清除。
                   2.但我的情況是被其他專案干擾只要將干擾的專案關掉即可。
   
          4.接下來在Release/Debug資料夾將產生libHelloJNI.so檔

將JNI加入JAVA的專案裡

  1. 將HelloJNI.java加到測試專案TestJNI裡 
 TestJNI.java程式碼:

public class TestJNI { public static void main(String[] args) { // TODO Auto-generated method stub new HelloJNI().sayHello(); } }

2. 在專案裡增加一個資料夾jni再將libHelloJNI.so放入jni資料裡
      3. 直接執行會發生錯誤
          Exception in thread "main" java.lang.UnsatisfiedLinkError: no libHelloJNI in java.library.path
原因是找不到libHelloJNI.so檔
解法: 1.設定好 eclipse JAVA Build Path          2.在程式碼中使用System.load(System.getProperty(java.class.path)+"/"+libHelloJNI.so);             來代替System.loadLibrary("libHelloJNI");即可

參考:
http://www.bogotobogo.com/cplusplus/eclipse_CDT_JNI_MinGW_64bit.php


Ubuntu的系統下的Eclipse的安裝及不能啟動的解決辦法(轉載)

1.最簡單的安裝方法是在Ubuntu的軟件中心在線安裝,如下圖所示:
Eclipse的安裝後的目錄結構如下:
(1)系統文件在“的\ usr\ lib目錄\月食”下,約120MB,主要目錄及文件如下圖所示:


(2)共享的系統文件在“usr/shar/eclipse”,約24MB,主要目錄及文件如下圖所示:


(3) 啟動的shell腳本在”usr/bin”中,如下圖所示:


2.安裝後,啟動Eclipse提示如下錯誤信息,不能啟動。下面分析原因並給出解決辦法。
按錯誤信息給出的路徑(注:.eclipse是隱藏的目錄),找到1379144725995.log日誌文件,主要內容如下:
java.lang.UnsatisfiedLinkError: Could not load SWT library. Reasons: 
    no swt-gtk-3740 in java.library.path 
    no swt-gtk in java.library.path 
    Can't load library: /home/zgj/.swt/lib/linux/x86/libswt-gtk-3740.so 
    Can't load library: /home/zgj/.swt/lib/linux/x86/libswt-gtk.so 
          ….............. 
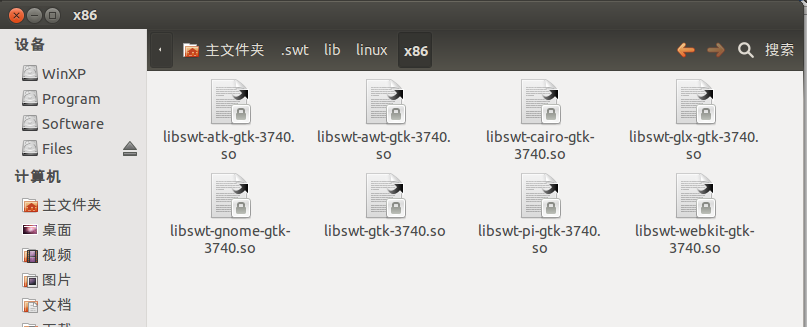
從以上內容可以看出:原因是不能加載/home/zgj/.swt/lib/linux/x86/ 下的一系列文件(8個.so文件),這些.so文件存放在“/usr/lib/ jni/”目錄下,如下圖所示:
可見:只需把這些.so文件複製或鏈接到/home/zgj/.swt/lib/linux/x86/ 目錄下即可。
zgj@reawish:~$  ln -s /usr/lib/jni/libswt-*  ~/.swt/lib/linux/x86/ 
執行命令後, /home/zgj/.swt/lib/linux/x86/ 目錄下就存放了這些.so文件的鏈接,如下圖所示:


總結: 
32bit系統: 
ln -s /usr/lib/jni/libswt-*  ~/.swt/lib/linux/x86/ 
或者
cp /usr/lib/jni/libswt-*  ~/.swt/lib/linux/x86 

64bit系統: 
ln -s /usr/lib/jni/libswt-*  ~/.swt/lib/linux/x86_64/ 
cp /usr/lib/jni/libswt-*   ~/.swt/lib/linux/x86_64 

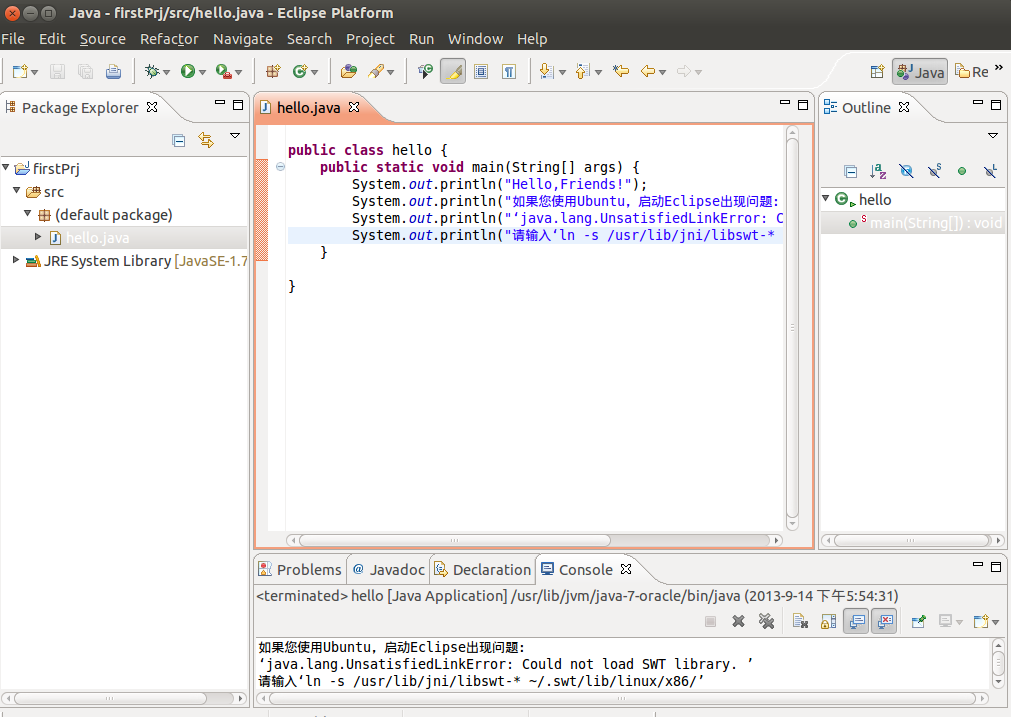
3.啟動Eclipse,測試一下Java程序運行的運行情況,測試結果正常,如下圖所示:

eclipse 執行 native code 發生 Exception in thread "main" java.lang.UnsatisfiedLinkError: no libXXX in java.library.path 的錯誤訊息

這是JAVA找不到*.so檔
一般是使用System.loadLibrary("libXXX") 來載入lib但是在我的環境會發生" Exception in thread "main" java.lang.UnsatisfiedLinkError: no libXXX in java.library.path" 的錯誤訊息
1.設定Java Build Path->Source->Native library location選so檔放的路徑也無效
2.設定Java Build Path->Libraries->Native library location選so檔放的路徑也是無效
PS:System.loadLibrary("libXXX") 會到 java.library.path 所指明的檔案夾去載入適當的 native library。
再來使用System.load(String)函數來嘗試
1.設定好 eclipse JAVA Build Path
2.在程式碼中使用System.load(System.getProperty(java.class.path)+"/"+libXXX.so);

ps:System.load(String) 則可以從指定 local file system 上的某個檔案來載入。

could not find class file for 'HelloJNI'

source java

package eMMC_Test;

public class HelloJNI {
static {
System.out.println(System.getProperty("java.library.path"));
System.load(System.getProperty("java.library.path")+"/"+"libHelloJNI_c.so");
//System.loadLibrary("libHelloJNI_c");
}
public native void sayHello();

$javah -jni HelloJNI 
出現could not find class file for 'HelloJNI'的錯誤訊息

使用網路上一些解法 Ex .-classpath和com.package.myclass包名都沒用
解法1.創建一個default package不用指定package執行javah -jni HelloJNI 可以過。
解法2.cd到bin那一層執行javah -jni eMMC_Test.HelloJNI 也可以解決。


參考:http://dannyshi.iteye.com/blog/1995070